.jpg?width=125&height=125&name=INT%20Logo%20Thumbnail%20(1).jpg)
Applies to: All products and plans
Connect a Calendar:
- Click the Settings (gear) icon in the main navigation menu.
- In the left sidebar menu, navigate to General.
- Click the Calendar tab.
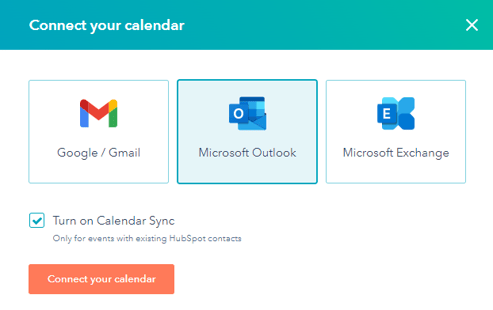
- Click Connect your Calendar.
- In the dialog box, click Google / Gmail, Microsoft Outlook, or Microsoft Exchange, then click Connect your calendar.
- Review the information in the dialog box, then click Accept and connect to [Selected email provider] to give the meetings tool access to your calendar.
7. You will be redirected to the meetings dashboard, where you can set up an individual scheduling page.
Scheduling Page:
Scheduling pages give contacts the ability to book meetings with you in HubSpot.
Note: Requires a paid seat.
- Navigate to Sales > Meetings.
- Click Create scheduling page.
- In the dialog box, select a meeting option:
- One-on-One: The contact will schedule time with just you or whoever the scheduling page is created for.
- Group (Sales Hub or Service Hub Starter, Professional, or Enterprise only): Displays time slots where all selected team members are available to meet. Use this option to enable a contact to book a meeting with more than one member of your team.
- Round robin (Sales Hub orService Hub Starter, Professional, or Enterprise only): Shows the individual availability of all selected team members. Use this option to enable a contact to book a meeting with a team member whose availability best aligns with their schedule.
- Click Next.
-
On the Overview page, edit the scheduling page's basic information.
- Internal name
- Organizer
- Title
- Location
- Add videoconference link
- Description
- Cancel and reschedule
- Meeting type (Sales Hub Professional or Enterprise or Service Hub Professional or Enterprise only)
- When complete, click Next.
-
Add team members:
-
Select which team members you want to include in the meeting.
- In the top right, click Add team member.
- In the right panel, click the Team members dropdown menu and select another team member, then click Confirm.
-
Add a Videoconference Link:
When creating a scheduling page:
- Navigate to Sales > Meetings.
- Click Create scheduling page.
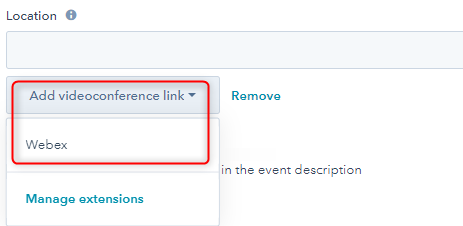
- Within the Overview tab, click Add videoconference link and select your videoconference app.
- Click Save.
Similarly, if you are editing an existing scheduling page:
- Hover over the desired meeting name > Click Edit.
- Within the Overview tab, click Add videoconference link and select your videoconference app.
- Click Save.
Share a Scheduling Page:
- Navigate to Sales > Meetings.
- Hover over the meeting name and click Copy link.
- Share the link with your contact.
Note: Depending on your HubSpot subscription, you can also embed the scheduling widget on your HubSpot pages or your external pages.